How to fill knowledge gaps
10/22/2022
Finding a new Android software development position can be a daunting task. When scrolling through requirements it is easy to get lost and overwhelmed. Endless job requirements can lead to the feeling that you are not ready yet or are not good enough to get into this field. I hope to have this post alleviate some of this stress. In it I hope to shed some light on how we as developers should approach learning new skills, and how we can know what to learn by distilling job adverts into their basic components.
This guide makes a basic assumption that you have some small amount of experience writing android applications. Not that you have necessarily released anything to the store, but more-so that you know the basics. If you do not, then I would recommend starting with the “Build your first android app” guide over on the Android Developers website and then heading back here to continue on your android journey.
Locating a Job Advert
Indeed has hundreds if not thousands of jobs listed for android developers. Searching “Android developer” on Indeed in my little neck of the woods in eastern Canada turns up almost 800 postings! Let us take a look at the requirements for a random job advert for a Junior developer.
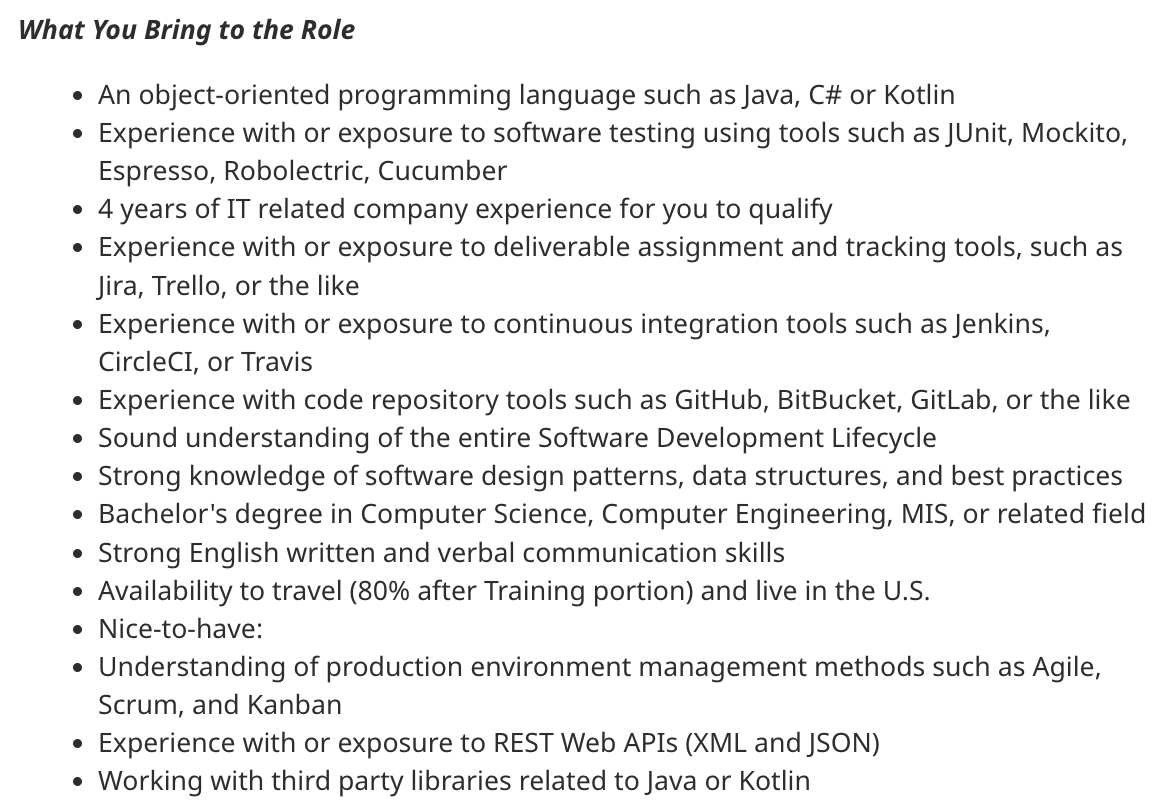
It should be pretty clear why things can feel overwhelming! But let us break this down.
Filtering the requirements
As you read through the bullet points listed above, you may notice that a lot of the individual items list more than one technology. We want to transform this list into an outline that can be used to guide our learning. For each line, we want to reduce it to a single sentence, and list relevant technologies underneath. We can remove anything that is not a learnable line item like years of experience or willingness to travel. This filtering step can be repeated ad nauseam for any given job advert.
- An object oriented language
- Java
- C#
- Kotlin
- Experience with or exposure to software testing
- JUnit
- Mockito
- Robolectric
- Cucumber
- Experience with or exposure to deliverable assignment and tracking tools
- Jira
- Trello
- Experience with or exposure to continuous integration tools
- Jenkins
- CircleCI
- Travis
- Experience with code repository tools
- GitHub
- BitBucket
- GitLab
- Sound understanding of the entire software development lifecycle
- Strong knowledge of software design patterns, data structures, and best practices
- Understanding of production environment management methods
- Agile
- Scrum
- Kanban
- Experience or exposure with REST APIs
- JSON
- XML
- Working with 3rd party libraries related to Java and Kotlin
Building software to learn new skills
So now we have a veritable laundry list of things to learn. The absolute first thing you should do is remove anything from this list that is irrelevant to you because you already know it. We want to create a plan in which we can focus in on ONLY the relevant skills listed here that you do not already know. The outline you created above should be kept somewhere such as a To-Do app or note taking app such as Notion. You can check things off as you learn them.
But how do we learn them? Well, trying to learn all of this stuff all at the same time is going to be an instant failure. No one can learn like that. What we need to do is take out outline and do the minimum number of things from it at a time in order to learn them. The best way I find to do this is to create a sample project and slowly apply more concepts to it.
There are a few categories that we can distill from the list in the last section:
- Project Management
- Deliverable assignment and tracking tools
- Production environment management methods
- Software development lifecycle
- Software development
- Object oriented programming
- Software testing
- REST APIs
- 3rd Party Libraries
- Design patterns
- Data structures
- Best Practices
- Tooling
- Continuous Integration
- Code repository tools
Each category is going to require a different approach to incorporation into our learning plan.
Project management
The types of tools listed in this category are required for every project you will ever work on in a professional setting. For each sample project you build, we can use a tool like Trello to create a board, and keep track of different tasks that you need to perform in order to get everything done. Trello can easily be used to implement a version of Kanban, one of the listed technologies. Using these two items throughout your sample projects will give you some exposure to them and check two things off your learning list. The last piece is the software development lifecycle which you can read more about here. You can then use this information to help plan out how you’ll tackle any given sample project. In creating and maintaining a Trello board as you go through the rest of the process, you’ll gain some of that initial exposure to working with these tools. Feel free to set aside a bit of time to explore some of the options in Trello. However, remember that a given tool only need be as complicated as necessary in order to perform a useful task for you, so don’t get too into the weeds with it.
Software Development
This role lists out a lot of software development items, which makes sense. In any given junior position, your most immediate role is that of a developer. You will spend the majority of your time reading and writing code. Let us take a look at how we could learn some of these skills. First, if you have not already, eliminate the ones that you already know. For example, if you are reading this you should already have a pretty good understanding of one of the recommended languages. Therefore, you should not have to worry much about basic object oriented concepts.
Some of these concepts are going to be applicable to our sample project we will go through below, but some will have to be read about and explored. For design patterns, I recommend the excellent “Gang of Four” book. For data structures, there are tons of visual and interactive online resources, which is true for best practices as well. If you want a great read about data structures in the context of interviewing, check out “Cracking the code interview.”
Tooling
If you have been writing code for a while, you are probably familiar with GitHub. If not, it is very quick and easy to set up an account. I recommend doing so, and getting set up with git on your computer of choice. If you are unfamiliar with git, I recommend learning the bare minimum, and there are a lot of great posts out there that will do a far better job than I at explaining it. One such example can be found here. As for continuous integration, the easiest way to get going with this is Github actions. These are linked below.
Building a test application to learn new skills
The core approach to learning any technical skill is to build something. You need to practice. There is no way out of this. Let us use the REST API requirement as an example. What components to we need in order to build an app which talks to a REST API? Off the top of my head, we need:
- A user interface
- A REST API
The exact user interface or REST API you utilize is up to you. There are a ton of great free REST apis on the internet, from movie databases to stocks. Pick one that interests you. For the UI, it depends on your personal preference. I am an Android Engineer, so I am most comfortable writing an Android app. For example, a basic app that hit a REST api would have a single screen that displays a list of content that we grab via a REST endpoint.
I’ve added details below and will link to a sample app which you can follow along with to build out this small application. It includes:
- Initial project set up
- Adding the UI state
- Adding the UI
- Adding the ViewModel
- Adding the Retrofit Service
- Adding the Retrofit modeling
- Wiring it all together
- Testing
- A simple Github action
Testing your application
Now that you have an application set up and it works, we can start incorporating other items from our list. Testing is a large topic, and one I hope to cover from the ground up in a later post. The original job advert that we are working from mentions four different technologies. I recommend taking them one at a time.
If you have never written a unit test in your entire life, I would recommend reading through the documentation over on the Android website, which can help give you a jumping off point to learning more about the process.
For our purposes, the first thing we are going to do is come up with a test plan. What that means is that we are going to lay out how we are going to approach testing each component of our application, and decide what we should not test. For our application, it could look something like:
- Write instrumentation tests agains the UI
- Write unit tests against the ViewModel
- Skip writing tests against your data source
Instrumentation tests are generally written using the Espresso test framework. These tests run on a physical android device or in an emulator, and are intended to ensure your UI does what it is supposed to. In many cases, they serve as integration tests, where we are testing large slices of our system rather than individual units, as we do in unit testing. When you implement these, you will want to use something like MockServer in order to ensure that your tests do not rely on network access, which can make them nondeterministic. Check out this post for more information about using MockServer.
You can also write “isolated” instrumentation tests, which just test your compose layouts. These are more akin to unit tests, since we are testing isolated composables. Google’s testing guide for Jetpack Compose takes this approach.
Unit tests are generally written using a unit testing framework like JUnit. When you write a unit test, you are focusing on a single unit of behaviour. For example, we could test that when we initialize a ViewModel, then we request the latest data from our API. We could do this in several ways, but my recommendation would be to “fake” the data source (being the retrofit interface) and then check the ViewModel’s state after initialization. Because you have used a fake data source, you should be able to avoid any asynchronous work, and be able to immediately verify your state after creating your ViewModel. We could then use a fake to create a separate test where, say, the data received is malformed or the network is unavailable.
When writing any kind of tests, we always want to follow the simplest code paths possible. We should exercise all the code paths we can, but we should try to eliminate things that make our tests unpredictable. Flakey tests are unreliable tests, and unreliable tests are untrustworthy. Our tests serve as the bedrock on which we can safely perform refactoring and add new features. They give us assurances that we have not broken pre-existing code behaviour. Therefore, we should ensure that we do not do things in our tests such as performing IO or running tasks in the background.
Skipping tests can make sense if the layer you are testing is hitting an obvious boundary (like the network or a database) or is only touching third party code. Since our retrofit interface is doing both of these things, it is a safe candidate to skip entirely. This would also apply to methods that are just passing data through, or that are simple getters or setters. There is no real logic happening there so there’s no behaviour to test.
Applying tooling
At this point, we can perform some tooling. For this step, we want to do the following:
- Set up a Github Repository for our code
- Push our code up into this repository
- Set up a Github action that builds our code.
All of these are very well documented on the GitHub website.
Putting it all together
Here is how I would approach writing this application from the ground up.
- Decide on my business requirements.
- App shows a list of trending movies with a name and an image.
- All data will come from the movie database.
- Let my business requirements inform my ui state design
- A collection of
data class Movie(val image: String, val name: String)
- A collection of
- Implement a simple UI that takes a list of movies and displays them:
MovieItemcomposable (ImageandText)MovieCollectioncomposable (LazyColumnofMovieItem)- A
MovieCollectionPreviewcomposable that hands a fakeList<Movie>toMovieCollectionso that I can see what I’m doing.
- Implement a simple
MovieViewModelthat exposes amutableStateOfofList<Movie> - Integrate the
MovieCollectionandMovieViewModelinto ourActivitysuch that theViewModelfeeds aList<Movie>to theMovieCollection. - Set up a Retrofit interface
MovieRetrofitServiceaccording to the documentation to access the “Popular” feed of the movie database.- Utilize
suspendfunctions for my interface, as detailed here. This will make testing easier later on. - Because the JSON format is different from our UI state format, we will want to return a specialized class here using one of the serializers available in retrofit (like Moshi) It is then up to the ViewModel to take objects of that class and turn it into a
List<Movie>
- Utilize
- Pass this to the
MovieViewModelsetting up a factory as needed. In theinitblock of the ViewModel, we can launch a coroutine in theviewModelScopeto perform the call and update our state.- This will require use of
Dispatchers.IOto ensure that we do not run the network call on the main thread. This means we want to hand this in to our ViewModel with a default parameter, so that when we write unit tests against this logic, we can use something likeUnconfinedTestDispatcher, which will make our tests deterministic.
- This will require use of
- At this point, we should have something basic that works, so we can try launching the app and working through any issues.
- Add some testing:
- UI Testing (Espresso):
- Given a list of movies, that each is rendered.
- Unit testing
- Use fakes to instantiate a ViewModel and test different scenarios like good data, empty data, etc.
- Since we are passing in an interface and a dispatcher, it is very easy to create a
FakeMovieRetrofitServiceand anUnconfinedTestDispatcherand just hand these into aMovieViewModel
- UI Testing (Espresso):
- Add some Github / CI
- Create an initial commit of all our work and push up to Github.
- Add a Github action that builds our app and runs the unit tests.
Conclusion
So what have we accomplished here? We have:
- Found a job advert
- Extracted relevant skills and technologies into a learning outline
- Built an application utilizing some of those skills
- Added additional technologies in a step by step sequence
I hope that this illustrates how you can extract learning lists from job applications. The important take-away here is that you need to keep things simple.
You can find my sample application for this post over on Github. I invite you to fork it and use it as a platform for whatever you are trying to learn, be it navigation, animations, or whathaveyou.
If you have any questions, comments, concerns, clarifications, corrections, or suggestions, the best way to contact me is via the Mastodon link in my footer.